
Installing a new graphics card can really give your PC a boost when it comes to playing even the most visually demanding games that you might want to play.
However, finding the right graphics card (mostly from companies such as Nvidia or AMD) is very important considering how many there are. The budgets also range from below $100 to above $1000.
 While it will be ideal to find the right graphics card that gives you most bang for your buck, it’s also important to consider a card’s heat, noise and power consumption. Of course, it’s important to check whether your PC has the right hardware to support your new card.
The most common problem that you might have is with the right power supply especially if it is multi-card configuration. Finally, the last thing that you must think about is whether there is enough space in your PC for the graphics card of your choice.
Now, installing a new graphics card is pretty simple. All you need is your PC, graphics card and a Phillips-head screwdriver. Make sure you turn off your PC and unplug it before you start the installation.
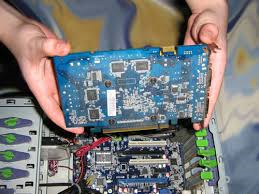
First, you have to remove the casing and then find the graphics card so as to remove it. If there’s isn’t one, then it’s time to locate the PCI-E x16 slot which is closest to the heat sink of the processor and which will either be the first or second expansion slot on your motherboard.
If you’re replacing an existing graphics card, remove any cables, loose wires as well as the existing screws from its retention bracket and the old graphics card and replace it with the new one. Use screws to hold the graphic card’s retention bracket to the your computer’s casing.
Also, you might need to add additional connectors and which is where connecting PCI-E cables will not work without that extra power and your PC might not be able to boot.